

How to Crochet a Ripple Blanket with Daisies – Free Pattern + Video
**You can purchase an INEXPENSIVE AD-FREE PDF of this pattern on Etsy HERE . This beautifully formatted PDF includes the step-by-step instructions and pictures to help you along the way. Thank you so much for supporting my work :)
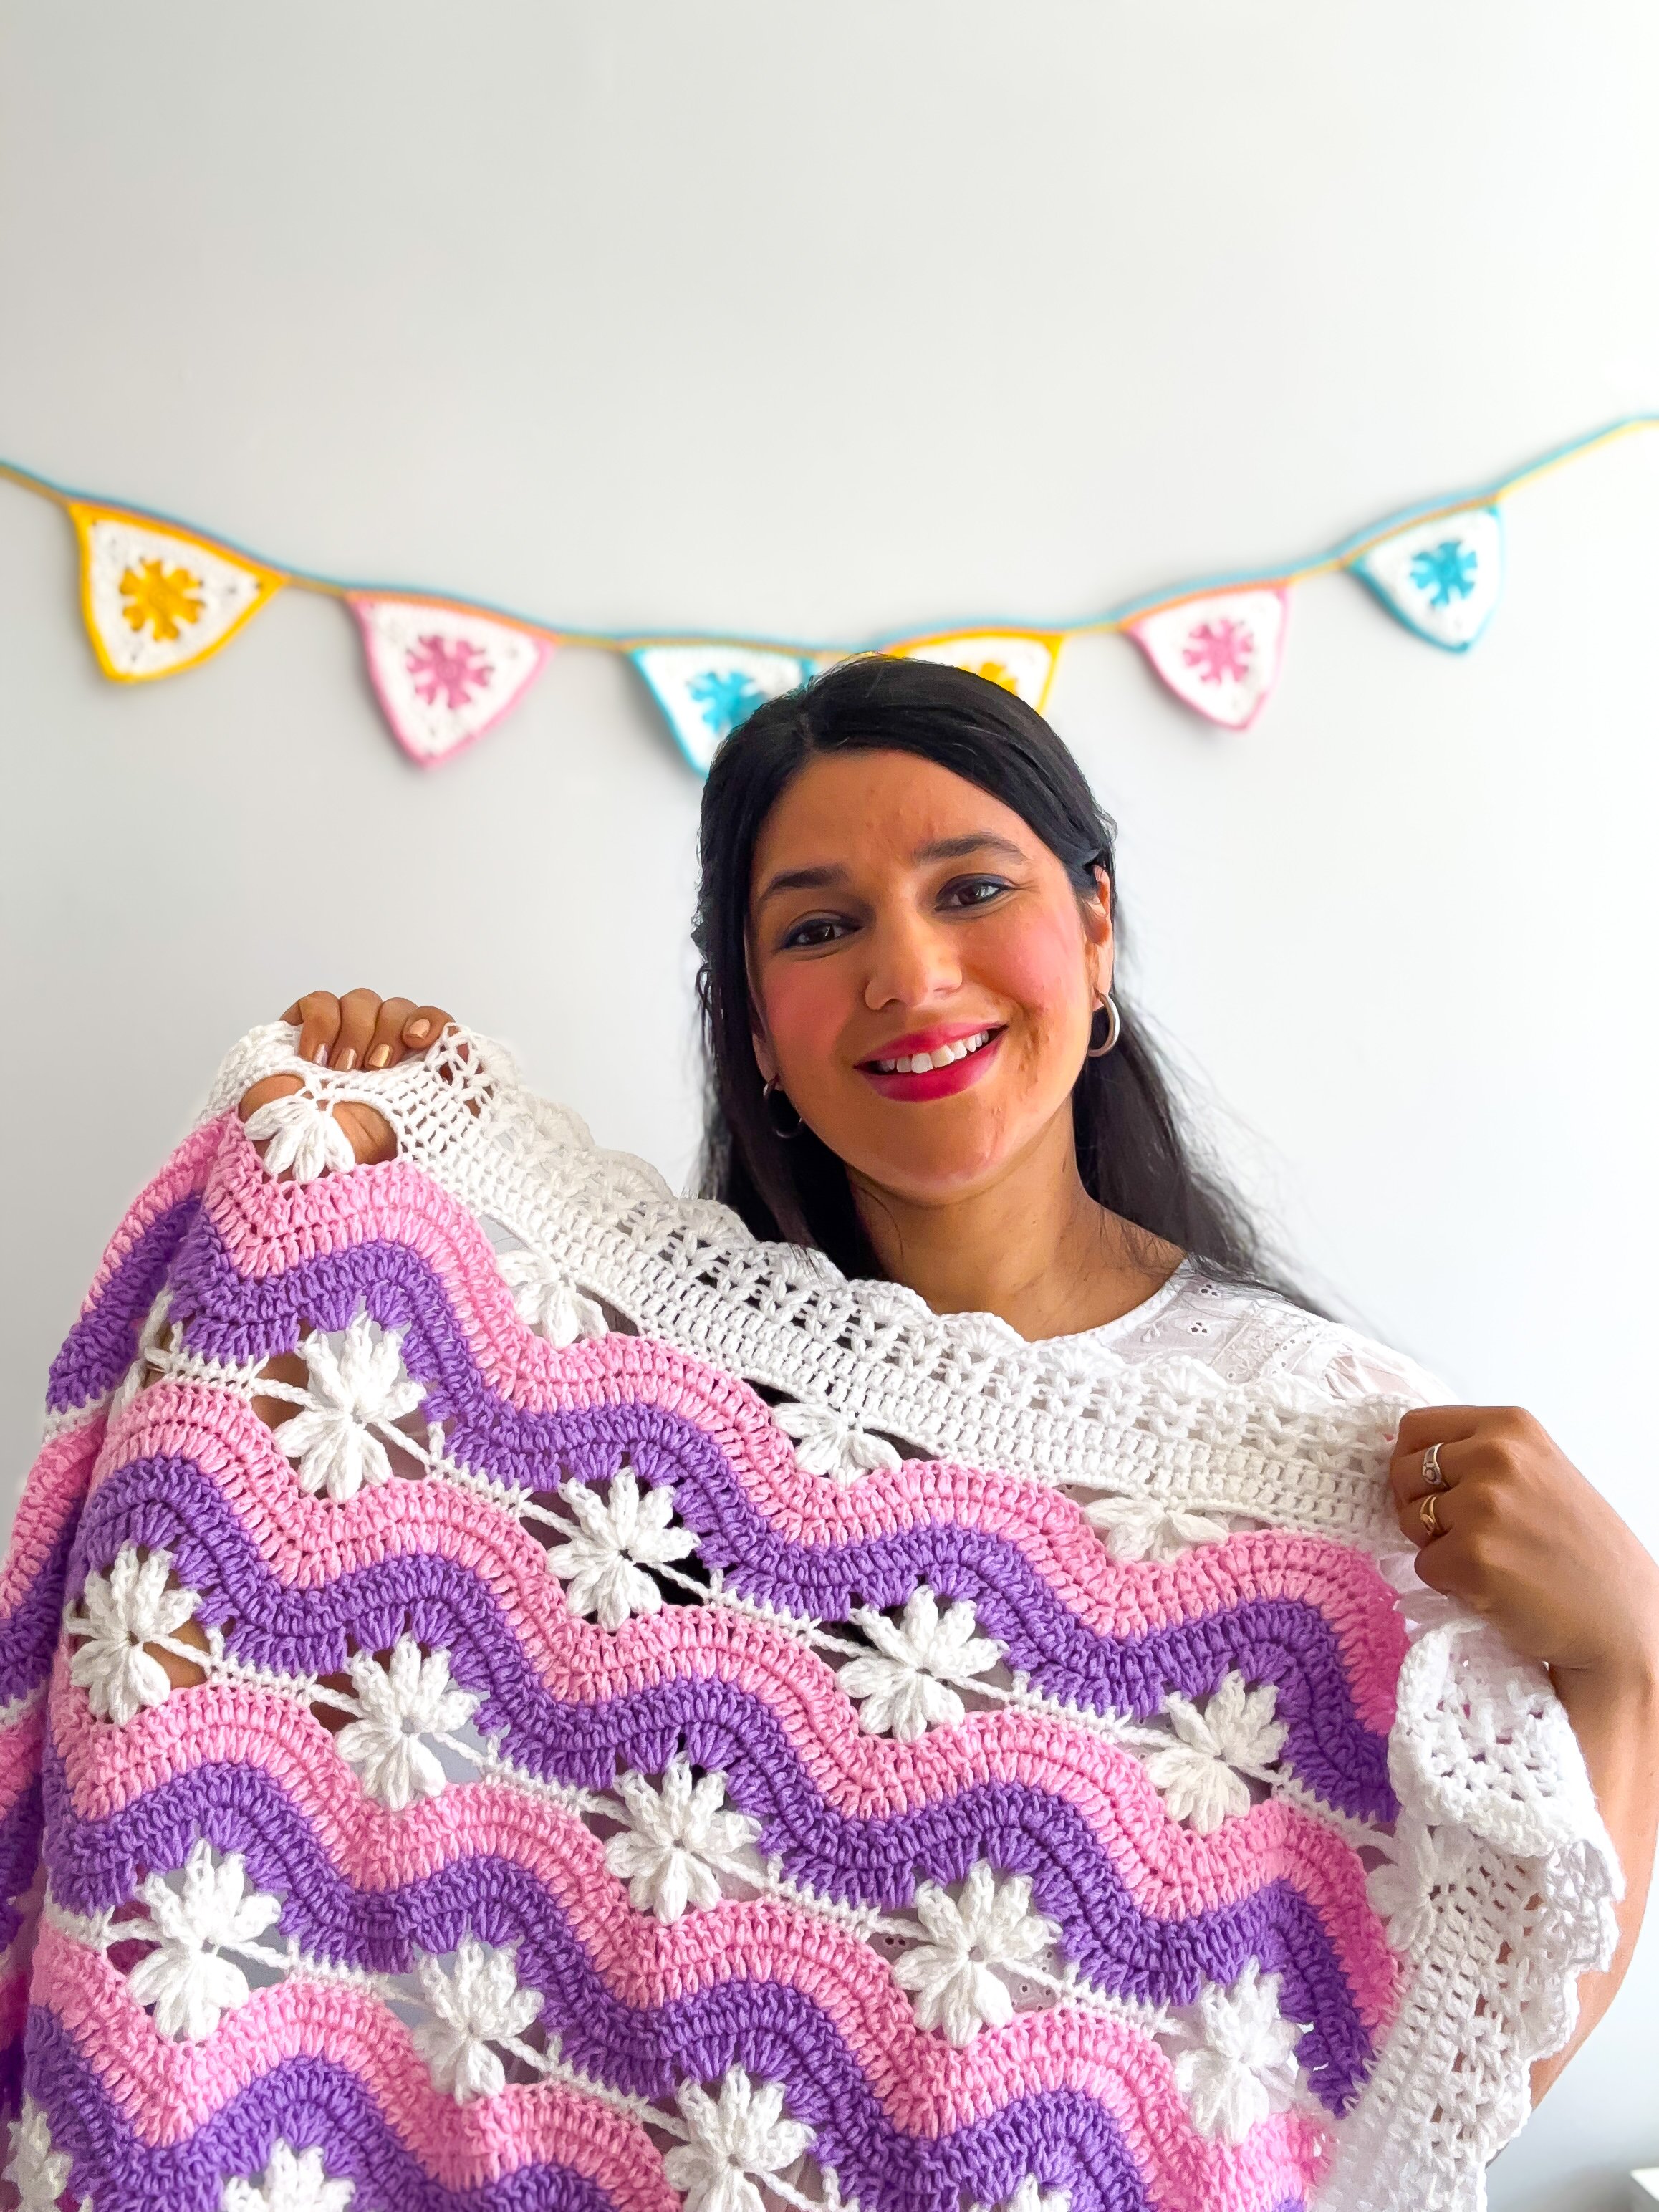
If you're looking for a crochet project that’s equal parts soothing to make and stunning to look at, you’re going to fall in love with this FIELD OF DAISIES Baby Blanket. With its gentle wave pattern, delicate little daisies, and soft pastel colors, this blanket is a true blend of vintage charm and modern style. It’s the kind of project that brings joy from the very first stitch to the final border, making it a perfect gift for new parents—or a lovely heirloom piece to keep for yourself.
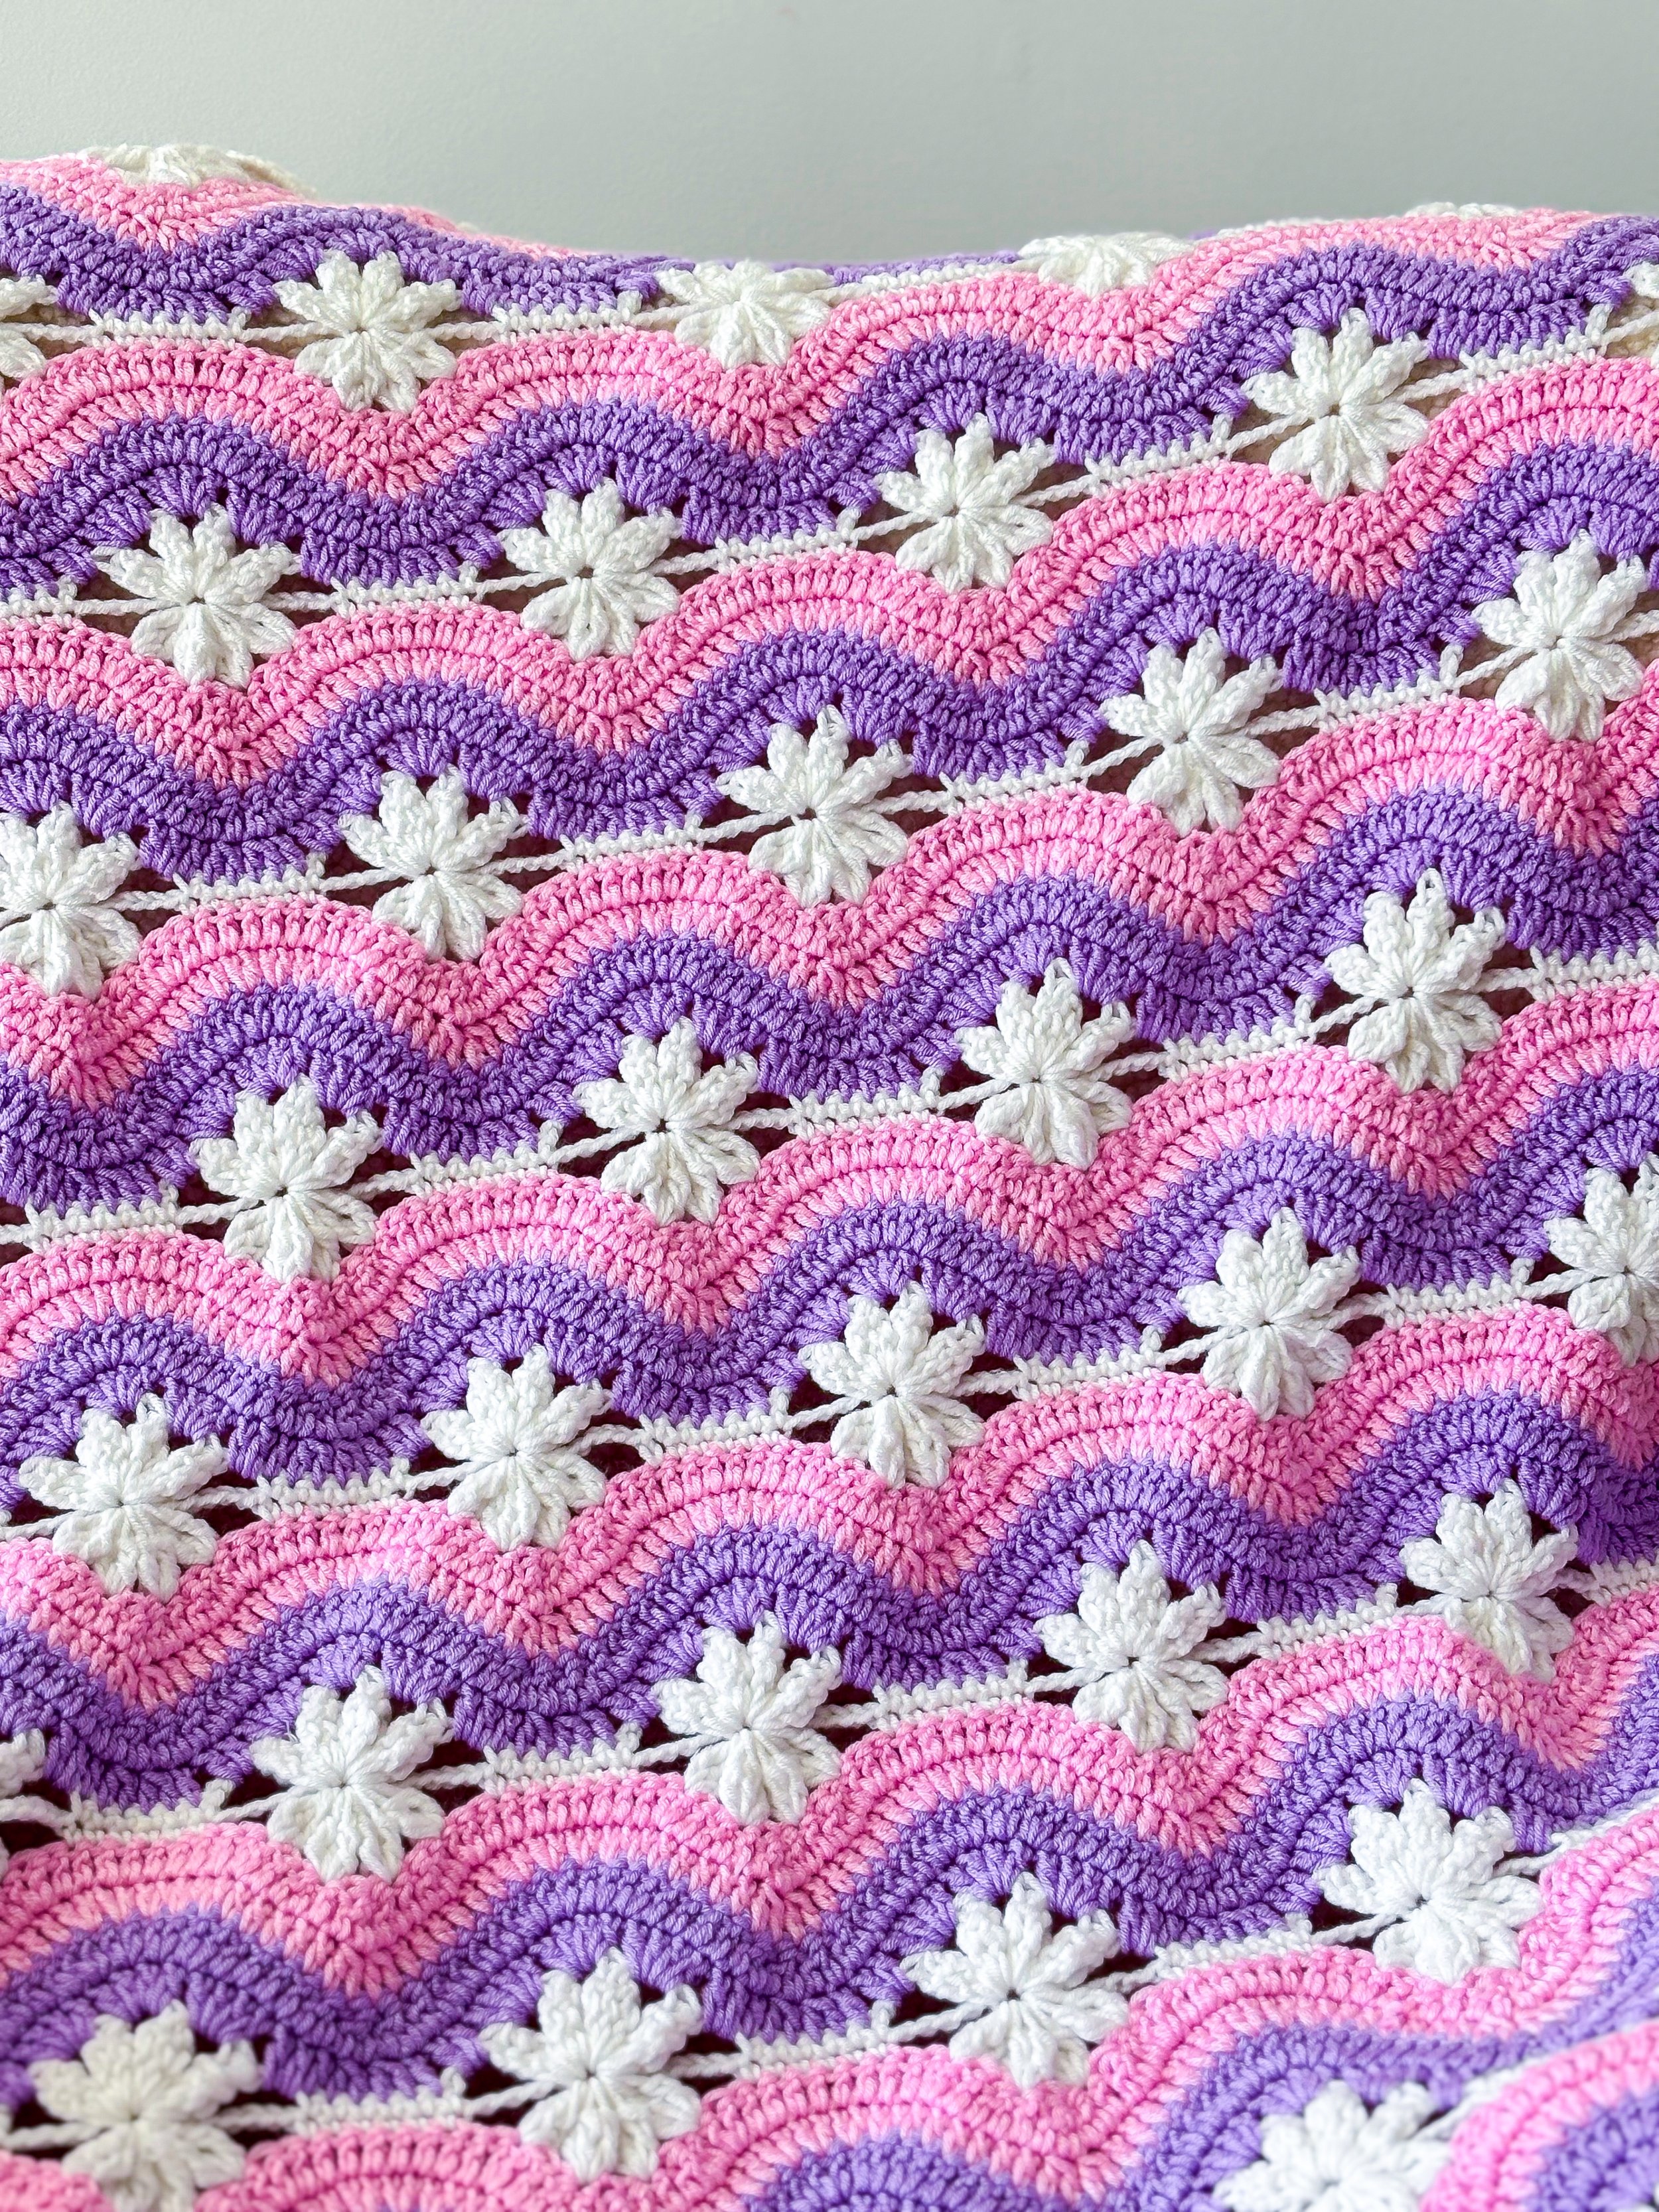
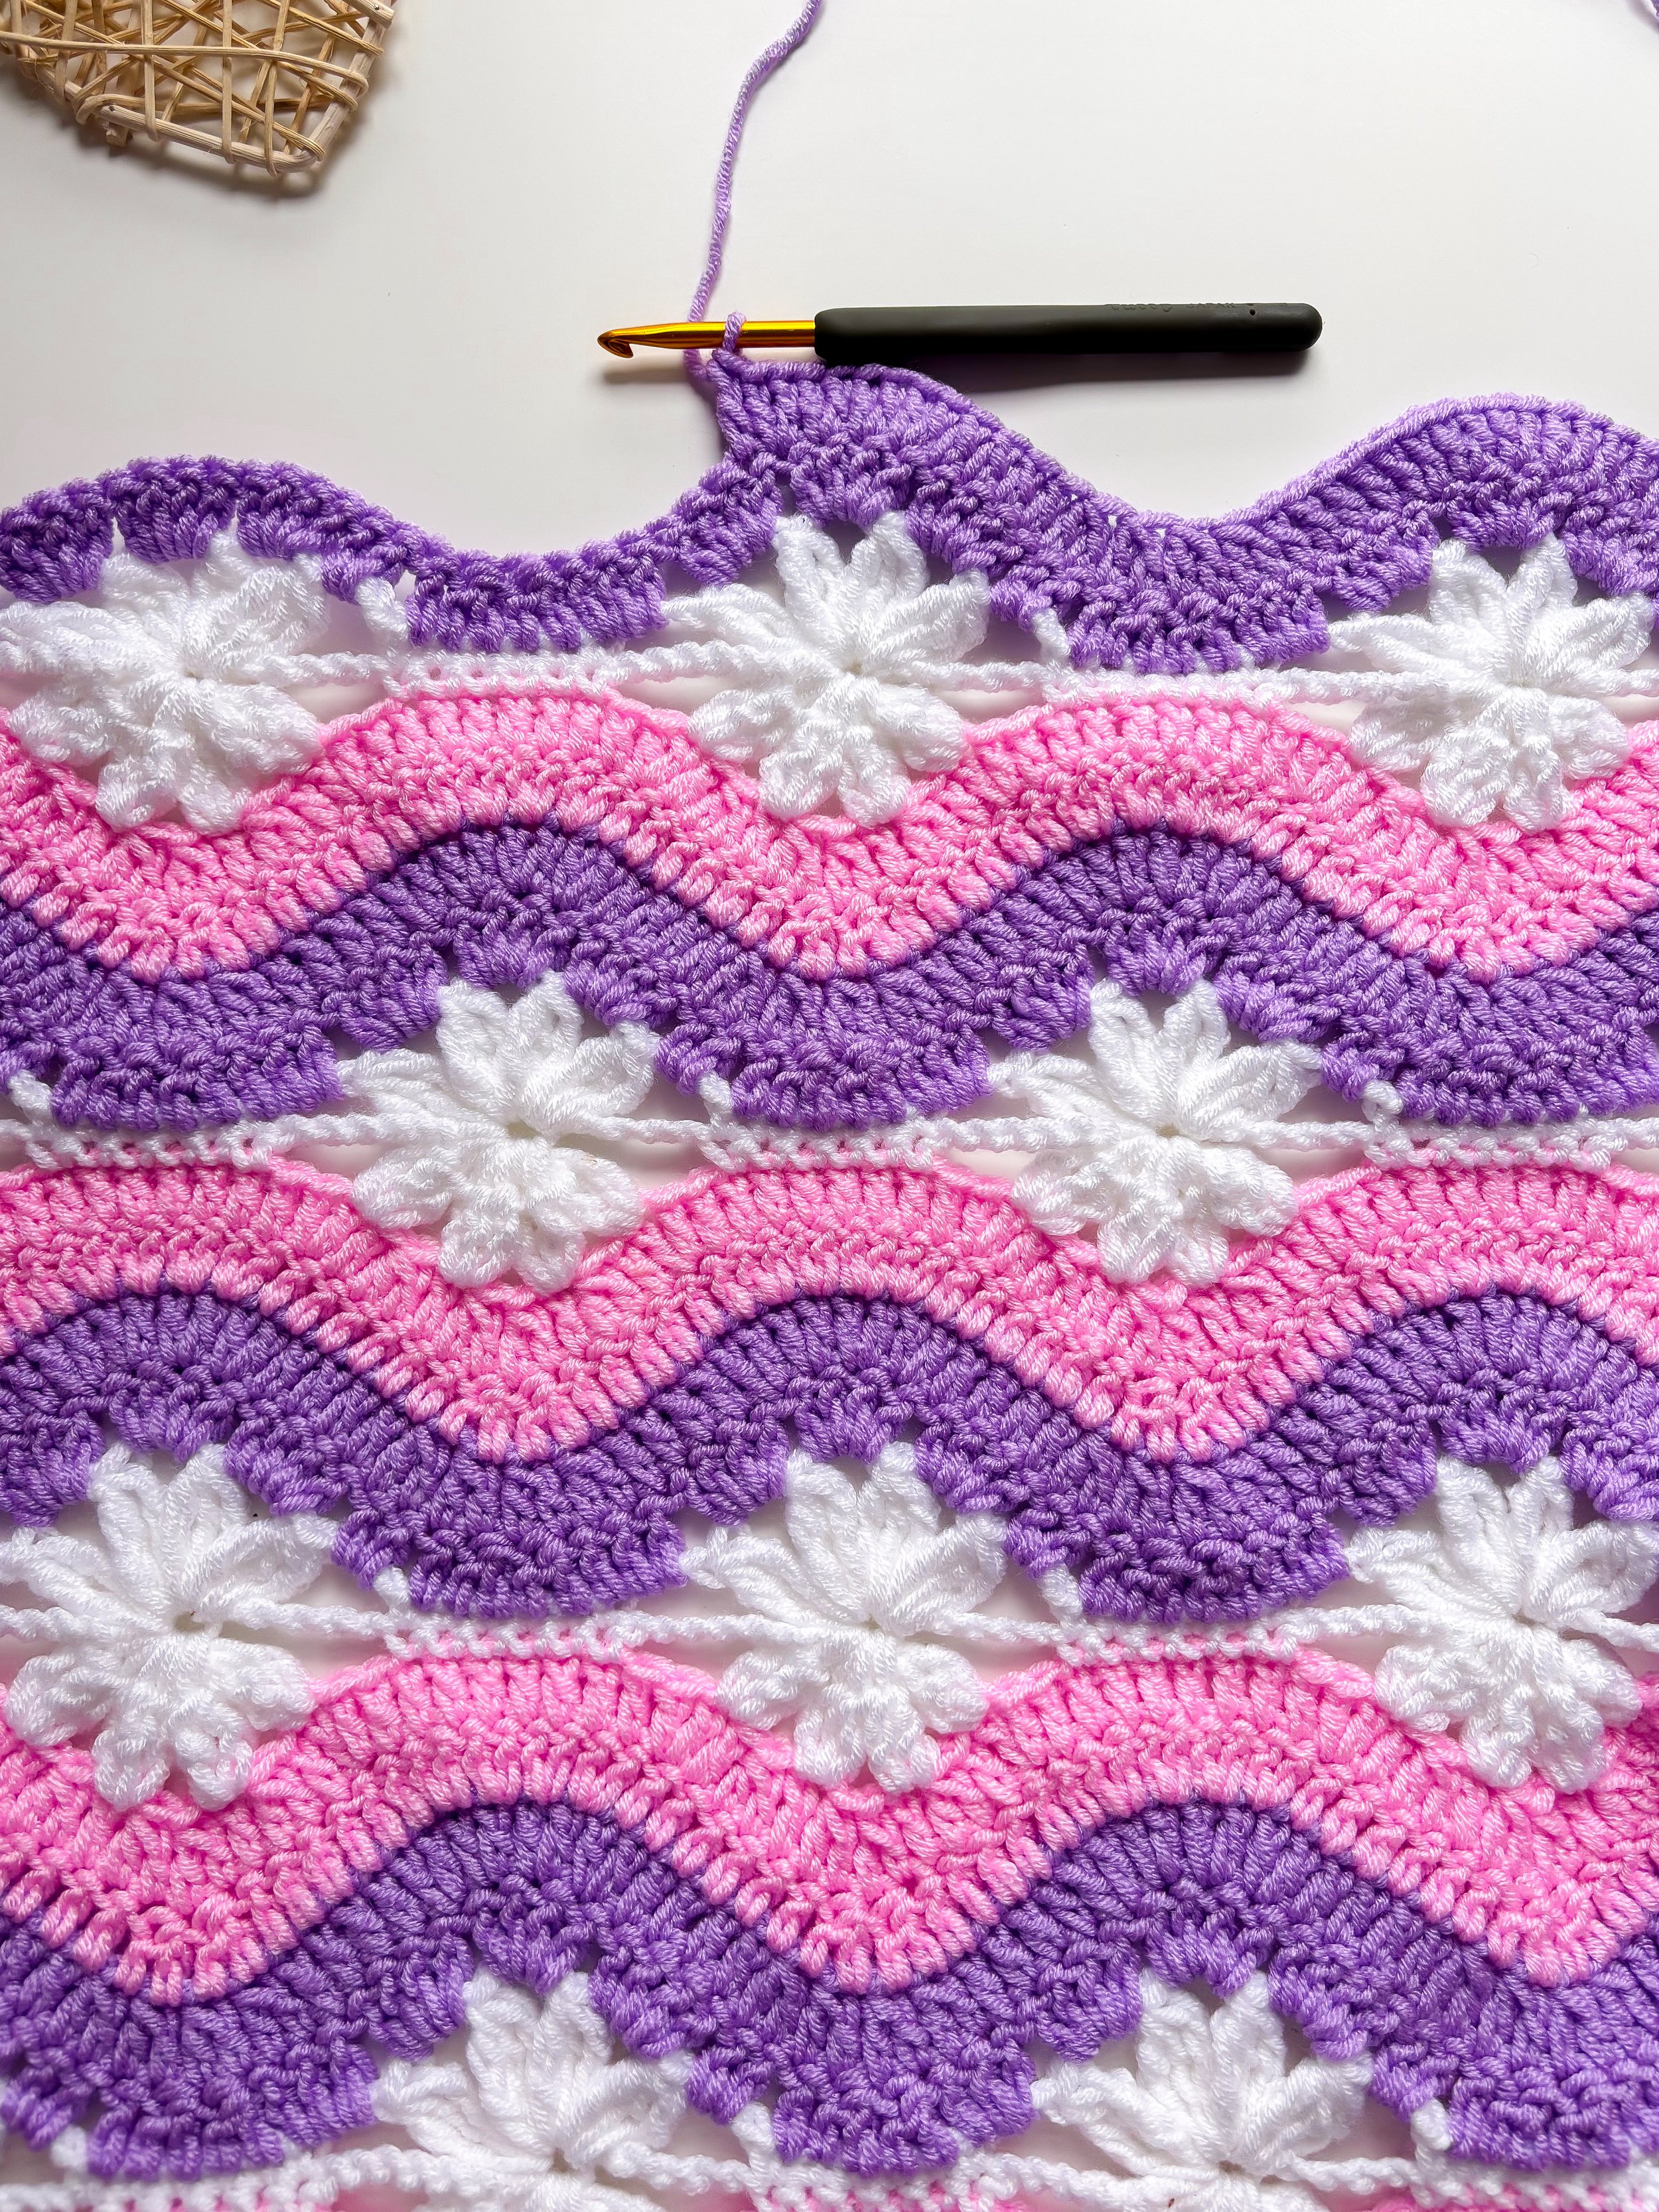
This is a classic ripple stitch blanket with a modern twist: the daisies. The ripple pattern creates a smooth, wave-like texture that gives the blanket a clean, structured look. Small floral details are spaced throughout the design, adding visual interest without overwhelming the simplicity of the ripple. The result is a fresh take on a traditional stitch—something that feels both timeless and current. Although it may look detailed, the pattern is easy to follow and works up in a steady, soothing rhythm, making it a great project to relax with in your free time.

One of the most important features for me when designing baby blankets is safety, and this pattern delivers. The soft openwork between stitches means the blanket is breathable, allowing air to flow through. That’s especially important for little ones, giving parents peace of mind that their baby can breathe through the fabric and stay safe, even during naps. It’s something I always consider when creating patterns for babies, and I’m proud that this one combines safety with style so well.
Another detail that makes this blanket extra lovely is the lightweight drape and soft texture, thanks to my absolute favourite yarn for baby blankets (find out below) It’s cozy without being bulky, easy to work with, and gentle on delicate skin. The colors I’ve chosen are soothing and dreamy, but you can also make it your own by playing with brighter shades, neutrals, or even rainbow tones for a completely different look.
How to Choose the Colors?
When selecting colors for this blanket, I recommend choosing either two shades of the same color or two complementary colors that work well together. Use the darker shade for the first two rows of each ripple pattern and the lighter shade for the last two rows to create a gentle gradient effect. For the flowers, use white yarn to make them stand out beautifully and add a crisp contrast against the ripples. Alternatively, you could create a more vibrant and colorful blanket by using the colors of the rainbow, changing shades every two ripple rows to add a playful and cheerful touch.
Whether you’re crocheting this for a baby shower gift, a nursery decoration, or just because you adore beautiful blankets, this pattern is full of charm, texture, and timeless beauty. It’s one of those projects you’ll come back to again and again—not just because of how gorgeous it turns out, but because of how much joy it brings while you’re making it.
If you’d like to get started, the free pattern below includes everything you need to make the standard baby-size version of this daisy ripple blanket. And if you’re looking for more options, the full paid pattern available on Etsy includes detailed instructions for making this blanket in five additional sizes. Whether you’re making it for a newborn, a toddler, or even yourself, there’s a version to suit every need. I hope you enjoy making this blanket as much as I did—it’s truly a joy to see it come together stitch by stitch :)
Are you a beginner and need more visual support? Follow along the video tutorial below!
Permissions + Copyright:
Please do not publish or share this pattern as your own. You may make items to sell with this pattern. In exchange, please link back this post. Do NOT use our photos as your own sales photos.
Materials
You will need:
Any DK yarn (I used Kind Feather by Hobbii Yarn,
100% Premium Acrylic; 100 gr= 235 m / 3.5 oz=257 yds)
*White (01)- color A - 3 balls
*Lavender (12)- colour B-2 balls
* Light Pink (10) - colour C- 2 balls
5 mm crochet hook or size needed to obtain gauge
Tapestry needle,
Scissors and Measuring Tape.
Skill Level:
This is an Intermediate crochet project but if you’re new to crochet and still want to crochet this beautiful blanket, I’ve created a full video tutorial where I explain STEP- BY- STEP how to crochet this blanket. WATCH THE VIDEO HERE.
Tension:
38 sts x 12 rows= 24 cm x 18.5 cm// 9.5 x 7 inches.
Chain 57 and follow rows 1-7 twice.
Abbreviations-
Pattern is written using American terms:
Ch- Chain
Ch-sp- Chain space
St/s- Stitch/es
Rnd- Round
RS- Right side
WS- Wrong side
Sc- Single crochet
Dc- Double crochet
Dc2tog- Double crochet 2 stitches together
Tr- Treble
V-stitch (V-st): (1 dc, 1 ch, 1 dc) in next dc
Tr2tog- Treble 2 stitches together (yarn over twice, insert hook into next stitch, yarn over and pull up loop, yarn over and pull through 2 loops on hook) 3 times, yarn over and draw through all 3 loops
Tr3tog- Treble 3 stitches together ({yarn over twice, insert hook into next stitch, yarn over, pull, [yarn over, draw through 2 loops] twice} 3 times, yarn over, draw through all 4 loops on hook)
MEASUREMENTS
Width without border: 84 cm/ 33 inches
Width with border: 97 cm/ 38 inches
Length without border: 92.5 cm/ 36.5 inches
Length with border: 105 cm/ 41 inches
CONSTRUCTION
You will work from the bottom up, repeating twelve rows in order to create the ripple effect and flowers and turning at the end of each row. The stitch pattern consists of twelve-rows repeat: four ripple rows, two flower rows, followed by four ripple and two more flower rows that you will repeat as many times as necessary to create the length of your blanket.
COLOUR WORK
Colors change every four (ripple rows) and two (flowers) rows, using three colors in total. You will always work this sequence of colors: White (A), Lavender (B) and Light Pink (C), repeating this sequence until your blanket is completed.
If you would like to avoid having thousands of ends to weave in you can do the following:
After completing a row, do not cut the yarn, instead attach the new yarn using a chain stitch, drop the old colour and continue working with the new colour for the number of rows needed (in this case it will always be two rows) and when you need to use the other colour bring it back and continue working as normal. When you work the border you will be able to hide the yarn left on the sides.
SPECIAL STITCHES:
FLOWER 1: Start working 1 tr2tog in next dc, don’t close it, miss 2 dc, start working 1 tr3tog in next dc, there are 6 loops in your hook, yarn over and pull through all 6 loops in order to close the stitch.
FLOWER 2: [Start working 1 tr3tog in next dc**, don’t close it, miss 2 dc] 4 times in total, finishing last rep at **, there are 13 loops in your hook, yarn over and pull through all 13 loops in order to close the stitch. This is half the flower and it has 4 petals.
FLOWER 3: Start working 1 tr3tog in next dc, don’t close it, miss 2 dc, start working 1 tr2tog in next dc, there are 6 loops in your hook, yarn over and pull through all 6 loops in order to close the stitch.
Start Here:
With colour A and 5 mm crochet hook
For SIZE 2: Chain 134
Row 1: Starting in 2nd ch from hook, 1 sc in next 3 ch, *2 ch, miss 6 ch, *(1 tr3tog, 2 ch) 4 times in next ch**, miss 6 ch, 1 sc in next 6 ch* rep from * to * until there are 9 ch left, finishing last repeat at **, miss 6 ch, 1 sc in last 3 ch. Cut yarn and knot to secure. 7 half flowers separated by 6 sc.
Row 2: Join yarn B to last sc of previous row. 2 ch and turn. Miss 1st sc (this is where the initial 2 ch begins), 1 dc in next 2 sc (2 ch+ 1 dc count as 1st dc2tog) *2 dc in next 2ch-sp, [4 dc in next 2ch-sp] 3 times, 2 dc in next 2ch-sp, 1 dc in next sc**, [1 dc2tog over next 2 sc] twice, 1 dc in next sc* rep from * to * until there are 2 sc left, finishing last repeat at **, 1 dc2tog over last 2 sc, 2 ch and turn. 140 dc in total.
Row 3: Miss 1st dc (this is where the initial 2 ch begins), 1 dc in next dc, 1 dc2tog, *1 dc in next 4 dc, 2 dc in next 4 dc, 1 dc in next 4 dc**, [1 dc2tog] 4 times*, repeat from * to * until there are 4 dc left, finishing last rep at **, [1 dc2tog] twice. Cut yarn and knot to secure. 140 dc in total.
Row 4: Join yarn C to last dc of previous row. 2 ch and turn. Miss 1st dc (this is where the initial 2 ch begins), 1 dc in next dc, *1 dc in next 6 dc, 2 dc in next 4 dc, 1 dc in next 6 dc**, [1 dc2tog] twice* rep from * to * until there are 2 dc left, finishing last rep at **, 1 dc2tog over last 2 dc, 2 ch and turn. 154 dc in total.
Row 5: Miss 1st dc (this is where the initial 2 ch begins), 1 dc in next dc, *1 dc in next dc, 1 dc2tog, 1 dc in next dc, 2 dc in next dc, 1 dc in next 8 dc, 2 dc in next dc, 1 dc in next dc, 1 dc2tog, 1 dc in next dc**, [1 dc2tog] twice* rep from * to * until there are 2 dc left, finishing last rep at **, 1 dc2tog over last 2 dc. Cut yarn and knot to secure. 140 dc in total.
Row 6: Join yarn A to last dc of previous row. 4 ch and turn. Miss 1st dc (this is where the initial 4 ch begins), FLOWER 1, *6 ch, miss 2 dc, 1 sc in next 6 dc, 6 ch**, miss 2 dc, FLOWER 2* rep from * to *until there are 7 dc left, finishing last rep at ** miss 2 ch, FLOWER 3, 1 tr in last dc, 5 ch and turn.6 half flowers separated by 6 sc and 2 half petals- one at the beg and one at the end.
Row 7: [1 tr3tog in 1st st, 2 ch] twice, *1 sc in next 6 sc, 2 ch**, [1 tr3tog, 2 ch] 4 times in center of next flower* rep from * to * until there is one half petal left, finishing last rep at ** (1 tr3tog, 2 ch, 1 tr3tog, 1 ch) all in center of last half petal, 1 tr in 4th ch from initial 4 ch from previous row. Cut yarn and knot to secure. 6 flowers separated by 6 sc and 2 half flowers- one at the beg and one at the end.
Row 8: Join yarn B to last tr of previous row. 3 ch (counts as 1st dc) and turn. 1 dc in 1ch-sp, 4 dc in next 2ch-sp, *2 dc in next 2ch-sp, 1 dc in next sc, [1 dc2tog over next 2 sc] twice, 1 dc in next sc, 2 dc in next 2ch-sp**, [4 dc in next 2ch-sp] 3 times*, rep from * to * until there is half a petal left and 2 ch-sp, finishing last rep at **, 4 dc in next 2ch-sp, 1 dc in last ch-sp, 1 dc in 4th ch from initial 5 ch, 3 ch and turn. 140 dc in total.
Row 9: 1 dc in 1st dc (this is where the initial 3 ch begins), 2 dc in next dc, *1 dc in next 4 dc, [1 dc2tog] 4 times**, 1 dc in next 4 dc, 2 dc in next 4 dc* rep from * to * until there are 6 dc left, finishing last rep at **, 1 dc in next 4 dc, 2 dc in next dc, 2 dc in 3rd ch from initial 3 ch from previous row. Cut yarn and knot to secure. 140 dc in total.
Row 10: Join yarn C to last dc of previous row. 3 ch (counts as 1st dc) and turn. 1 dc in 1st dc (this is where the initial 3 ch begins), 2 dc in next dc, *1 dc in next 6 dc, [1 dc2tog] twice, 1 dc in next 6 dc**, 2 dc in next 4 dc* rep from * to * until there are 2 dc left, finishing last rep at **, 2 dc in next dc, 2 dc in 3rd ch from initial 3 ch, from previous row, 3 ch and turn. 154 dc in total.
Row 11: Miss 1st dc (this is where the initial 3 ch begins), 1 dc in next 3 dc, *2 dc in next dc, 1 dc in next dc, 1 dc2tog, 1 dc in next dc, [1 dc2tog] twice, 1 dc in next dc, 1 dc2tog, 1 dc in next dc, 2 dc in next dc**, 1 dc in next 8 dc* rep from * to * until there are 4 dc left, finishing last rep at **, 1 dc in next 3 dc, 1 dc in 3rd ch from initial 3 ch from previous row. Cut yarn and knot to secure. 140 dc in total.
Row 12: Join yarn A to last dc of previous row. 1 ch and turn. 1 sc in first 3 dc, *6 ch, miss 2 dc, FLOWER 2, 6 ch**, miss 2 dc, 1 sc in next 6 dc* rep from * to * until there are 5 dc left, finishing last rep at ** miss 2 dc, 1 sc in next 2 dc, 1 sc in 3rd ch from initial 3 ch from previous row, 1 ch and turn. 7 half flowers separated by 6 sc.
Row 13: 1 sc in first 3 sc, *2 ch, *(1 tr3tog, 2 ch) 4 times in in center of next flower, miss 6 ch from previous row**, 1 sc in next 6 sc* rep from * to * until there are 3 sc left, finishing last repeat at **, 1 sc in last 3 sc. Cut yarn and knot to secure. 7 flowers separated by 6 sc.
Rows 14 to 49: Repeat rows 2 to 13 three more times.
Rows 50 to 60: Repeat rows 2 to 12.
DO NOT fasten off as we will continue working on the border of the blanket.
Border:
The border of the blanket is worked in six rounds without turning, so the right side of your work will be always facing you. When working the vertical sides of the blanket, it won’t be clear enough where to place each stitch so I recommend working 2 sc over 1 row of double crochet rows or 3 ch, 1 sc over rows that start with single crochet, 3 sc over rows of treble crochet or 4 and 5 ch and 1 sc in the center of the flower. This way you will achieve a balanced edge.
Continue working with color A and 5 mm crochet hook.
Turn your work 90 degrees to start working on the side of the blanket.
Rnd 1: [STEP 1] Evenly distribute 123 sc along the vertical side edge (try to keep your tension loose when working the vertical sides of the blanket, otherwise it can shrink), continue working on the base of the blanket and work:
[STEP 2]
1 sc in first 3 sc, *6 sc in 6ch-sp, 1 sc in center of flower, 6 sc in next 6ch-sp**, 1 sc in next 6 sc, * rep from * to * until there are 3 sc left, finishing last rep at ** 1 sc in next 3 sc (there are 133 sc in total)
Continue working on the other vertical side of the blanket repeating STEP 1 of the Border, rep STEP 2 when you reach to the top of the blanket, sl st to 1st sc of the round.
You should have 123 sc on each vertical side and 133 sc on both top and base of your blanket. 512 sc in total.
Rnd 2: 3 ch (counts as 1st dc here and throughout), 1 dc, 2 ch, 2 dc in same space, 1 dc in next 123 sc of the vertical side, (2 dc, 2 ch, 2 dc) in next sc, 1 dc in next 130 sc, (2 dc, 2 ch, 2 dc) in next sc, 1 dc in next 123 sc of the other vertical side, (2 dc, 2 ch, 2 dc) in next sc, 1 dc in next 132 sc from the top of the blanket, sl st to 3rd ch from initial 3 ch. There are 136 dc on the top, 134 dc on the bottom and 127 dc on each vertical side= 524 dc in total and 4 2ch-spaces.
Rnd 3: Move with sl st to next 2ch-sp, 3 ch, 1 dc, 2 ch, 2 dc in same ch-sp, 1 dc in each dc across the vertical side, (2 dc, 2 ch, 2 dc) in next corner space, 1 dc across the base, (2 dc, 2 ch, 2 dc) in next corner space, 1 dc across the opposite vertical side, (2 dc, 2 ch, 2 dc) in next corner space, 1 dc across the top of the blanket, sl st to 3rd ch from initial 3 ch. There are 140 dc on the top, 138 dc on the bottom and 131 dc on each vertical side= 540 dc in total and 4 2ch-spaces.
Rnd 4: Move with sl st to next 2ch-sp, 4 ch (counts as 1st dc + 1ch-sp), V-st in same 2ch-sp, *miss 2 dc, [V-st in next dc, miss 2 dc] rep the steps in [...] until next corner space**, (V-st, 1 ch, V-st) in next corner space* rep from * to * 3 more times, finishing last rep at **, 1 dc, 1 ch in next corner space, sl st to 3rd ch from initial 4 ch. 43 V-sts on each vertical side, 45 V-sts on the base, 46 V-sts on the top of the blanket and 2 V-sts in each corner space separated by 1 ch.
Note: You will miss 3 sts instead of 2 before the corner space on the base and top of the blanket.
Rnd 5: Move with sl st to next ch-sp, 4 ch, 1 dc in same ch-sp, *[V-st in next 1ch-sp from next V-st] rep the steps between [...] until next 1ch-sp from corner, (V-st, 1 ch, V-st) in next corner space* rep from * to * 2 more times, [V-st in next 1ch-sp from next V-st] rep the steps between [...] until next 1ch-sp from corner, V-st, 1 ch in last 1ch-sp corner space, sl st to 3rd ch from initial 4 ch. 45 V-sts on each vertical side, 47 V-sts on the base, 48 V-sts on the top of the blanket and 2 V-sts in each corner space separated by 1 ch.
Rnd 6: 3 ch (count as 1st dc), 2 dc in next 1ch-sp from V-st, *1 sc in 1ch-sp from next V-st, [(3 dc, 1 ch, 3 dc) in next 1ch-sp from V-st, 1 sc in 1ch-sp from next V-st] rep the steps between [...] until next corner space**, (3 dc, 1 ch, 3 dc) in next 1ch-sp from corner space* rep from * to 3 more times, finishing last rep at ** [(3 dc, 1 ch, 3 dc) in next 1ch-sp from V-st, 1 sc in 1ch-sp from next V-st] rep the steps between [...] until there is one V-st left before the corner space, 3 dc in next 1ch-sp, 1 ch, sl st to 3rd ch from initial 4 ch. Cut yarn and weave in ends. 23 SHELLS (3 dc, 1 ch, 3 dc) on each vertical side, 24 SHELLS on the base and top and 2 V-sts in each corner space separated by 1 ch.
Each shell consists of: (3 dc , 1 ch, 3 dc)
Steam block your blanket to straighten the sides and achieve a smoother look.
🌺🌺🌺🌺
Well That Was Fun! What's Next?
📌 PIN THIS POST - Don't lose this project; save it to your Pinterest crochet board so you can quickly come back to it again.
💌 SHARE - Share your yarn choice, in-progress, or finished projects on Facebook or Instagram and use the hashtag #leoneladiy
🥂 JOIN - Join our small community on Facebook: Dublin Bay Crochet